Laptop Setup for ROS Kinetic
Posted: October 31, 2014
WARNING: OLD VERSION!
You should use the Laptop Laptop Setup for ROS Noetic now.
Part of the ArloBot setup is to have a laptop riding on board the robot to run ROS. This article is a quick set of instructions for setting up that Laptop.
My Laptop:
I bought a well used HP EliteBook 2760p on Ebay.
It is great for the robot because it has a reversible touch screen!
It also has two batteries so it can go a long time on a charge.
It has a 64 bit quad core i5 2520M CPU, which should be snappy for ROS.
The TurtleBot comes with an ASUS "Netbook" with an Atom N525 dual-core 1.8GHz CPU. While this works, I think it should be considered the absolute minimum for a usable laptop for ArloBot.
Lubuntu 16.04 Desktop 64 bit:
ROS Kinetic is built for Ubuntu LTS 16.04 Desktop. It is the "Long Term Support" (LTS) version, so you can download and use it for several years without having to upgrade to the next version. This gives the ROS development community some stability in their target OS.
I am using the Lubuntu variation of Ubuntu in order to reduce the RAM usage of the operating system on the laptop in the hopes of leaving more system resources available for ROS. Here is a review someone did on the system resource utilization of each "buntu" distribution: Ubuntu 14.10 vs Kubuntu 14.10 vs Xubuntu 14.10 vs Lubuntu 14.10 vs Ubuntu GNOME 14.10: A Comparison
The bottom line is that any of them will work exactly the same for ROS. The "light weight" Lubuntu and/or Xubuntu will allocate less RAM and a few less CPU cycles to the Desktop GUI, allowing ROS a little more room to work. Don't expect miracles, but every little bit counts.
Just remember that it must be an Ubuntu Desktop variant of version 16.04 LTS (the .01, .02, .03 on the end is fine). Other Linux distributions will not work, nor will newer versions of Ubuntu. We can hope that ROS becomes more compatible in the future, but for now at least this requirement makes for relatively easy installation of ROS.
These instructions should be the same for Ubuntu, Lubuntu or Xubuntu.
Note that some of these instructions are from my last install that did use "ordinary" Ubuntu, so some of the screenshots and text will reflect "Ubuntu" instead of "Lubuntu".
NOTE 8/216/2017: These instructions were originally written for an older version of ROS and Ubuntu. If you see mistakes referencing that old version, please let me know.
Download lubuntu Desktop 16.04 LTS 64bit ISO (lubuntu-16.04-desktop-amd64.iso) from https://help.ubuntu.com/community/Lubuntu/GetLubuntu/LTS
My laptop has no DVD drive, so I have to use a USB stick or something else.
Use the instructions here to create a bootable USB stick if you need to:
http://www.ubuntu.com/download/desktop/create-a-usb-stick-on-windows
NOTE: I have UEFI Boot Mode disabled in the BIOS! I found no benefit from it.
NOTE: Remember to turn off "Fast Boot" in the BIOS, and enable USB boot if it isn't already to get it to show up in the boot options.
I recommend that you do NOT plug into Ethernet! This way the Ubuntu setup will ask you to configure WiFi during setup, proving it works and getting it pre-configured during install!
Boot from the USB stick or DVD you created with the Lubuntu (or Ubuntu, Xbuntu, etc.) ISO.
Install Lubuntu (or Ubuntu, Xbuntu, etc.)
Connect to WiFi
CHECK: Download updates while installing
CHECK: Install this third-party software
Continue
Pick your Installation Type
Really, anything here will work. You can dual boot with Windows or another Ubuntu version, or erase the disk.
I recommend not using encryption,
and you do not need LVM either.
Continue
Your Name: Chris L8(replace with the name you want)
Your computer's name: ArloBot(Or pick something else)
Pick a username: chrisl8(Replace with the user ID you want for Ubuntu)
CHECK: Log in automatically - I prefer this, but you don't have to.
UNcheck: Encrypt my home folder
Continue
On first boot let the Software Updater install all updates and reboot if asked to.
If you are using Ubuntu:
Once Ubuntu starts click on the "Search Desktop" button, type "terminal" and run Terminal:
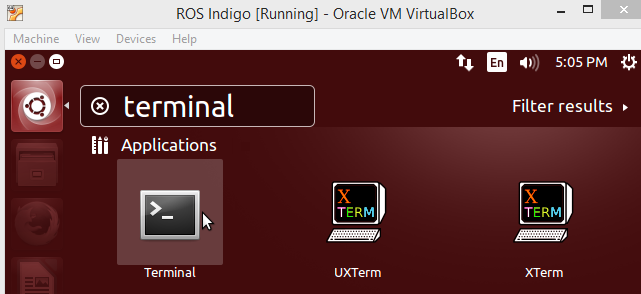
Right click on the icon on the Launcher and "Lock" it to the Launcher:
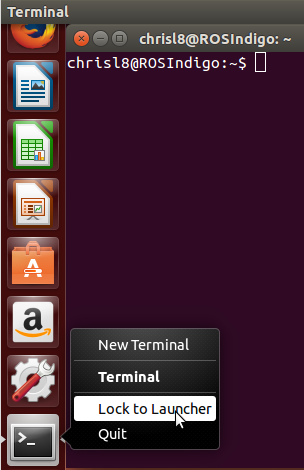
You can also drag it up higher on the Launcher after you lock it,
and you can right click it and run a "New Terminal" when you need another one.
If you are using Lubuntu:
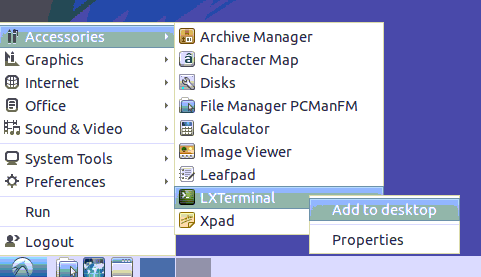
Click on the menu button at the bottom left,
Click on Accessories,
Right click on LXTerminal and select "Add to Desktop" if you want it easy to access from the desktop.
Install the SSH server:
sudo apt install openssh-server
Now you can use ssh from Linux or PuTTY where you can cut/paste.
If you are not familiar with how to use SSH to connect to Linux machines, search the Internet for "ssh putty tutorial". I thought this one looked pretty good: SSH Tutorial for Windows
Enable Remote Control of GUI Desktop:
The entire idea of a robot is to be remote, so it will help a lot to be able to control it from your desktop.
VNC works well. If your normal computer is running Windows use TightVNC.
If you are on Ubuntu you can use Remmina. Click on the "Search Desktop" button, type "remmina".
VNC Setup on Lubuntu:
https://wiki.ubuntu.com/Lubuntu/RemoteDesktop
Install vino by running:
sudo apt install vino
Configure VNC by running this from LXTerminal:
vino-preferences
CHECK: Allow other users to view your desktop
CHECK: Allow other users to control your desktop
UNcheck: You must confirm each access to this machine
CHECK: Require the user to enter this password:
and put in a password.
Close
Click on the menu -> Preferences -> Default applications for LXSession, and set up Remote Desktop to start when GUI starts,
by selecting the "Autostart" tab,
and CHECK: Desktop Sharing
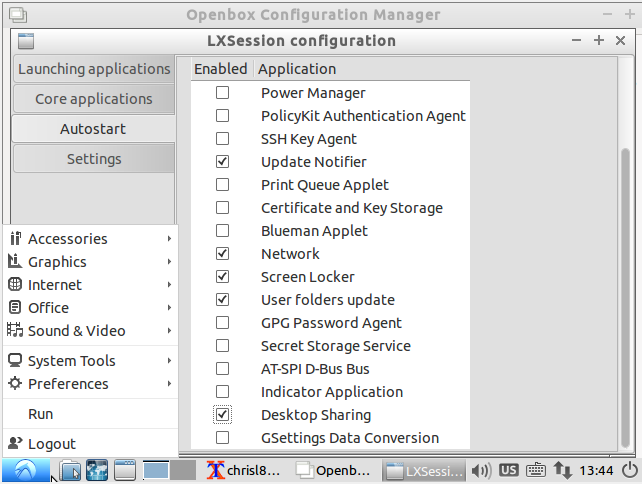
NOTE: I also UNcheck "Update Notifiier" and "Screen Locker", but that is personal preference.
From LXTerminal run:
gsettings set org.gnome.Vino require-encryption false
Otherwise TightVNC cannot connect due to silly encryption policies that it cannot understand!
Reboot to startup VNC and test it.
VNC Setup on Ubuntu:
Search: "remote"
Run "Desktop Sharing"
CHECK: Allow other users to view your desktop
CHECK: Allow other users to control your desktop
UNcheck: You must confirm each access to this machine
CHECK: Require the user to enter this password:
and put in a password.
From the terminal run:
gsettings set org.gnome.Vino require-encryption false
Otherwise TightVNC cannot connect due to silly encryption policies that it cannot understand!
Customize Ubuntu Desktop:
These are all a matter of personal preference, but I find this to be the best way to set things up.
Lubuntu:
Preferneces -> Light Locker Settings:
Turn "Enable light-locker" OFF
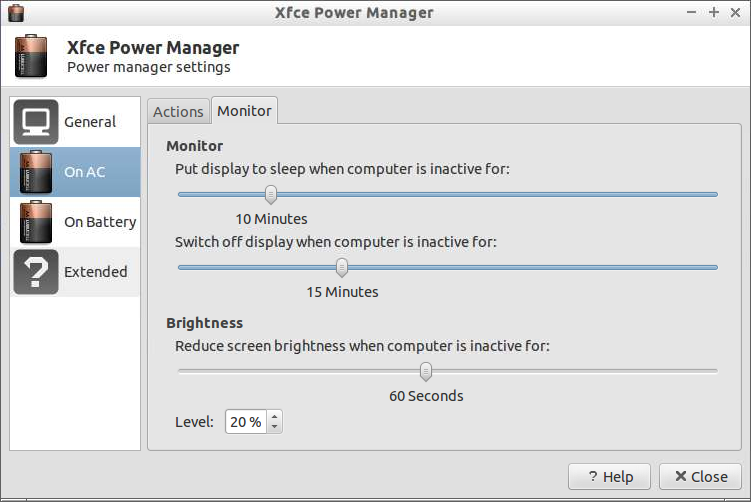
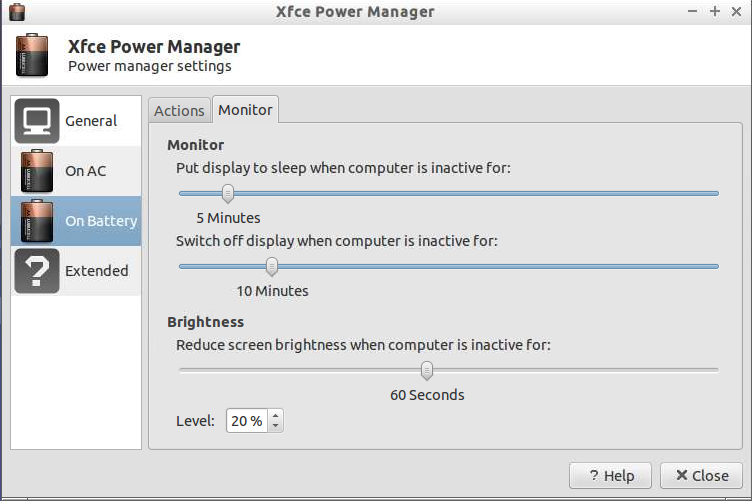
-> Power Manager:
On AC: When laptop lid is closed: Nothing
On Battery:
- When battery power is critical: Shutdown
- When Laptop Lid is closed: Nothing
You can also adjust the screen off times and when it dims.
I like to set it to dim after some time and to shut off eventually.
Ubuntu:
Settings->Brightness & Lock:
CHECK: Dim screen to save power
Turn screen off when inactive for: 5 minutes (or set as you like)
Lock: Off
UNCHECK: Require my password when waking from suspend
Appearance-Look:
Change "Wallpapers" to "Colors & Gradients"
Pick the sold box on the left
Change the color box to black
Power
Suspend when inactive for: Don't Suspend Don't suspend
When power is critically low: Power off
When the lid is closed: Do Nothing Do nothing
Byobu: (I use tmux myself, but if you are new to Linux, this is a good option)
When you run ROS nodes on the laptop via SSH they will be in your session. If your session disconnects it will stop ROS.
To allow your session to continue in the case of an accidental or even purposeful disconnect you can use a program called tmux (or screen) that lets you leave running "sessions" open. byobu is a front end to tmux that makes it pretty and easier to use.
sudo apt install byobu
byobu-enable This will cause byobu to automaticlaly start when you connect via SSH.
Log off and back on,
The first time you press ctrl-a it will ask if you want this to go to work with Emacs or Screen, pick Screen.
F1, Toggle Status, add/remove what you want. I like to add the battery level.
**Disable lid close detection:
**If you want to run your laptop on the robot with the lid closed, you may need to do this, because when you reboot or try to shut down while the lid is closed and the laptop is on battery power, as soon as XWindows shuts down the computer goes to sleep before it even shuts down!
This leaves the laptop in a limbo where it sleeps until the battery dies with no hope of connecting to it until you open the lid and let it finish shutting down!
I found two solutions. I am using the first option, which works for me, but if Option 1 doesn't work try Option 2.
Option 1. Set "IgnoreLid=true" in /etc/UPower/UPower.conf
sudo vi /etc/UPower/UPower.conf
CHANGE:
IgnoreLid=false
TO:
IgnoreLid=true
Option 2. Set LidSwitchIgnoreInhibited=no and HandleLidSwitch=ignore in /etc/systemd/logind.conf:
sudo vi /etc/systemd/logind.conf
CHANGE:
#LidSwitchIgnoreInhibited=yes
TO:
LidSwitchIgnoreInhibited=no
AND CHANGE:
#HandleLidSwitch=suspend
TO:
HandleLidSwitch=ignore
Reboot to make these changes take affect.
NEXT!
Next you will want to do the ROS Kinetic Setup